In this post you’re going to learn:
- How to use one single pattern to play both the major and minor pentatonic scale, and the blues scale
- How to play all five shapes of the pentatonic and blues scale across the entire neck (both major and minor)
- How to find the right pattern to use in any key (both major and minor)
- How to get out of the boxes altogether, and play up and down the neck
- How to practice scales so that they sound more like music and less like finger exercise
- What is a pentatonic scale anyway, and how does it relate to it’s diatonic brethren?!
(Disclaimer: In order to fully utilize this material, you should first memorize the note names on the low E string up the whole neck. With that in mind, after you read this post, you will know exactly how to solo in any major or minor key using pentatonic scales!)
Here’s what’s really cool and what is going to be a main theme to this blog post:
Even though the major and minor pentatonic scales, and the blues scale are technically different scales – we can use the same shapes to play all three! Confused? I would be too, and I was. So hang on and let me explain.
The only difference between major and minor pentatonic is which note you call the root or the first note of the scale. The shapes are the same.
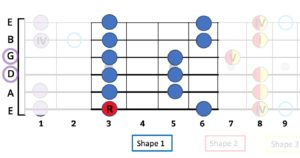
For instance, here is G minor pentatonic. The “G” is the note on the 3rd fret of the low E string. That’s the starting note and the R means “Root” – the musical theory term for the starting note:
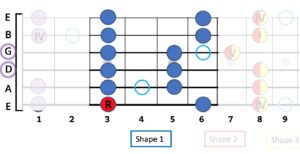
Here is G Blues (same as above but with the blue note added as a passing tone):
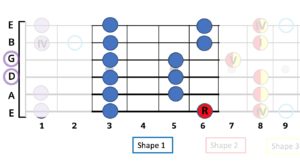
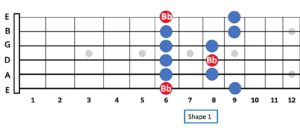
And here is Bb major pentatonic. The “Bb” is the note on the 6th fret of the low E string. That is the starting note or Root:
What’s the difference between the three? This is kind of like one of those bar room photo hunt games cuz they are almost identical.
The only difference between the pentatonic scales and the blues scale is the “blue note” which is just a passing note that connects two other notes. In that sense, it’s not really a note in the scale at all.
And the difference between the major and minor pentatonic was simply which note we called the Root (starting note). In the minor example, the root note was a “G” and in the major example, the root note was a Bb (pronounced Bee -flat).
Before we go deeper into how this little magic trick of using one shape for both major and minor works, let’s go over a little bit of helpful music theory. Pentatonic scales have 5 notes, while regular major and minor scales, which are diatonic scales, have 7 notes. You can derive a minor or major pentatonic scale from their diatonic brethren, by just taking a two notes away. Let’s look:
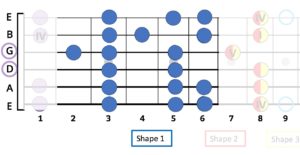
Below is a Bb major/G minor diatonic scale shape. You can see it’s got a couple of extra notes from the shapes above, and that the added notes are just a fret away from their neighboring notes – looks kind of jumbled, right? Notes within a pentatonic scale enjoy a more suburban lifestyle, while notes within a diatonic scale have to get very close with their neighbors – more like big city living.
The main gist and defining sound of the pentatonic scale is that it avoids all half steps, meaning that no two notes are right next to each other like you see in the diatonic shape above. Remember, the “blue note” in the blues scale is just a bluesy passing tone and not really part of the scale per se.
So, in order to make the diatonic scale into a pentatonic scale and avoid all the half steps, the notes that make up the minor pentatonic will end up being different scale degrees in relation to the root than the ones that make up the major pentatonic. Confused? Me too. Pictures ALWAYS help. Check it out…
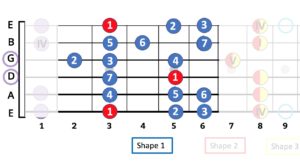
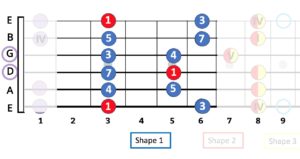
Here’s a pattern of the Minor Diatonic Scale with all seven notes in 2+ octaves. Read it left to right, starting from the bottom (the low E string). After it gets to 7, it goes back to 1 and so on…
And here is the Minor Pentatonic Scale, where we take away the 2nd and 6th scale degree so that there’s no two notes right next to each other. This leaves us with 1,3,4,5 and 7:
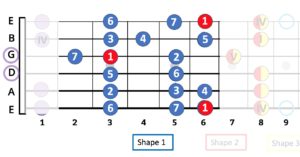
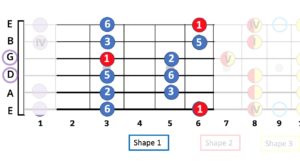
Now for major – here’s the same pattern showing the Major Diatonic Scale with all seven notes in 2+ octaves:
And here is the Major Pentatonic Scale where we take away the 4th and 7th scale degree, so that there’s no two notes right next to each other. This leaves us with 1,2,3,5 and 6:
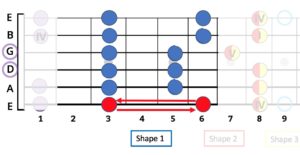
The beauty of this, is that the notes used in any minor pentatonic scale are the same notes used in the major pentatonic scale that starts three frets up the neck, AKA a minor third above! Or, we can say that the notes used in any major pentatonic scale are the same as the minor pentatonic that starts three frets down the neck, AKA a minor third below!
You might be wondering, “How can minor and major scales be the same shapes?”
The short answer is that although there is a different combination of whole steps and half steps to make a minor key vs. a major key, the sequence is the same, and only the starting point is different. Even though the notes you take out to lose all the half steps end up being different scale degrees in relation to the root, the sequence is identical, it just starts in a different place. The awesome and convenient result is that every minor has a relative major with the same notes and vice versa.
A minor key’s relative major can be played by simply starting on the note that is up 3 frets and a major key’s relative minor can be played by simply starting on the note that is down 3 frets.
So here we demonstrate how you can use the same first shape of the minor pentatonic scale as major pentatonic if the root is where the pinky goes on the low E string. What I want you do right here is jam on this same shape using both a G minor backing track and a Bb major backing track! You’ll find that the same shape works great with both, yet they sound different to your ear.
Play this scale using the jam track right below it:
Now play this scale over the backing track right below it:
You see how that works? Like magic! 😀
Ok, so now that you’ve got your first shape down, what if I give you some other keys to play in? The beauty of the guitar is the the shapes are exactly the same in all 12 keys! On piano, sax, etc, each key has a different shape and fingering. Aren’t we lucky?
So all we have to do is shift the shape around using our starting notes (roots) as the starting point. Remember that minor is with the 1st finger starting note, and major is with the pinky starting note.
Here’s an example of moving to another key – here’s Bb minor – earlier you played in Bb major. Notice the difference! Before your pinky started and now your first finger starts on the same note:
Try it out with this track:
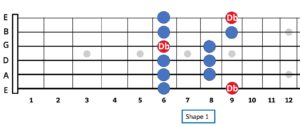
And now same shape, but this time with the pinky being the root note of a major key – Db Major:
Try the above pattern with this backing track:
Now that you know how to use this one scale shape to play in any key, what do you do next?
LEARN THE ENTIRE FRETBOARD – which we can break in different patterns/shapes!
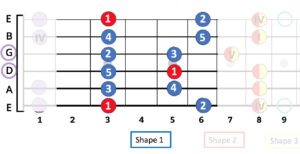
Here’s all five shapes of the pentatonic and blues scale in G minor (also Bb major) as a reference. The I, IV, V just refers to the root notes of the G, C and D chords in a G blues progression. On those chords, these notes will be the strongest ones to play or land on in a phrase. If you shift this pattern around to different keys, the notes names will be different but the I,IV, and V will still be in the same place within the shapes – this is why thinking in numbers and intervals can be more valuable and far easier to a guitar player than thinking in note names.
This can be intimidating and I wouldn’t try to tackle all of these shapes at once. It is far more important to take a “less is more” approach and work on your phrasing, timing and articulation on just a few notes before trying to get the whole fretboard under your fingers.
Using just the first shape you can really bring the notes to life using slides, vibrato, bends, hammer ons and pull offs, before trying to master all of the shapes. Once you know how to be a melodic player with some tasty phrasing, the rest of the shapes will be your playground and not just more notes to press down.
With that said, start by adding the “House of Blues” extension which is easy to get to from the main shape.
Then move on to shape 4. These three shapes will give you a great range from lowest to highest note.
Once you are comfortable with that, run through all of the shapes and try to describe their visual patterns. Ask yourself how one shape relates to the next. What is similar and what is different? How is it symmetrical or asymmetrical? Draw the shapes yourself on a piece of paper to help reinforce it.
Then, to get out of the boxes (after you learned them all), practice going horizontally up the fretboard using single strings, and pairs of strings.
Heres’ an example of a single string pentatonic scale:
Then play around with two strings up the fretboard. Try playing adjacent notes together, as a double stop!
Next, try using 3 strings horizontally, and just have fun exploring the connections! This kind of playing will lend itself to slides and other cool ideas you never played before. Take one idea in one area, and try it out in the next area. The pattern will be similar but the notes will be different.
You can also try different intervals and run them up the neck with a cool rhythm – here’s one I really like:
You’ll also want to apply different melodic patterns to the scales and play those patterns going up and down each shape. Let’s say the notes of the scale are 1,2,3,4 and 5. This is just the consecutive order – nothing to do with music theory and how it relates to the diatonic scale, which we went over earlier. With that said, here is what I mean:
Here are some of the most common and cool sounding patterns to practice:
Pattern One:
1,2,3 2,3,4 3,4,5 etc. until you get to the top. Then, going backwards from the highest note in this shape that would be 2,1,5 1,5,4 5,4,3 4,3,2 etc.
Pattern Two:
1,2,3,4 2,3,4,5 3,4,5,1 etc., and backwards from the highest note in this shape – 2,1,5,4 1,5,4,3 5,4,3,2 etc.
Pattern Three:
1,3,2,4,3,5 etc. and backwards from highest note in this shape – 2,5,1,4,5,3,4,2,3,1 etc.
These patterns will help you with technique, memorization and will also get you away from just playing up and down the scale without any melodic variation.
Practice Tips
Groove and timing are way more important than speed!
To work on your groove, timing, and technique, be sure to practice with either a metronome, drum track, or loop some rhythm guitar that you can practice over, making sure to groove hard and lock in with the beat. If you are playing at a tempo that makes you sound sloppy, then you are going way too fast.
Practicing at slow tempos is what really improves your sense of time and solidifies good technique. Keep track of your tempos and gradually increase.
There are lots of great drum machine and metronome apps, and a wealth of youtube channels that put out backing beats and tracks at various BPM and in various styles.
Each day try to practice in a different key, moving your shapes around the fretboard.
I hope this was helpful! If you have any questions or feedback, please email me at [email protected].
Download an entire collection of 15 pentatonic and blues scale charts for free, including all of the things that I referenced throughout this post by clicking here:







Brilliant, thanks!
I’ve gone through it all, really helpful. Cheers
Good to hear. Thanks!
Thanks, my primary study is harmonica, but I still like to learn what I can.
I have more understanding in one hour than 6 months worth of lessons thank you very much for your website and teaching